Evading anti-virus with Powershell Armoury
TL;DR;
PSArmoury is a PowerShell script that allows you to easily get the newest versions of all your favourite offensive PowerShell craft and automatically put it together in a single, encrypted .ps1-file. Think of it like a “yum update” that pipes the result in an encrypted container to take it with you. AMSI and EDR bypass included :-)
PSArmoury
I wrote my “Powershell Armoury” script a while ago to tackle two issues I often encountered during engagements:
- First, I’m a huge fan of PowerShell and if possible, I do everything in PowerShell. So after some time I got a pretty big list of already existing tools and self-made scripts that I want to take with me when doing a Windows or Active Directory assessment. However all these different scripts (even my own ;-)) get updated frequently and I usually ended up with some out-dated software in the field.
- Second, most of the existing well-known PowerShell tools like PowerView or Inveigh will be detected instantly by any anti-virus solution - at least on disk.

So I created PSArmoury, which allows me to do the following:
- Create a simple json config file containing links to all my favourite tools on the internet. You only have to do this once.
- Then, everytime before an engagement you just run New-PSArmoury and it will automatically fetch the newest version of all those PowerShell scripts and put them together in a single, encrypted ps1-file. This is your Armoury.
Let’s have a look at that. You can find PSArmoury on Github. Just download or clone and you’re ready to go. First, let’s have a look at the config. PSArmoury comes with a sample configuration file called PSArmoury.json that already references some well-known tools like PowerSploit or Inveigh. You can use this for inspiration. The configuration file is just a JSON array containing the different script files you want to include. An array member looks like this.
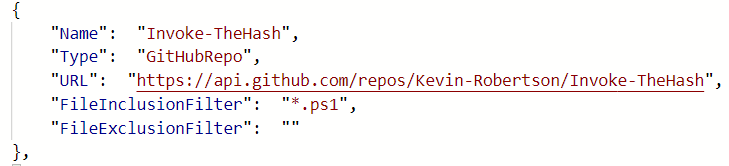
Every config item consists of a name, an URL, a type and optional inclusion/exclusion filter. The major difference here is the type and there are three differen types available.
- GitHubRepo: this instructs PSArmoury to automatically include all files in the Github Repo (that matches the Inclusion/Exclusion filter). It will ask for a Github username and personal access token since we use the Github API here.
- GitHubItem: this instructs PSArmoury to download a single file from Github. It will ask for a Github username and personal access token since we use the Github API here.
- WebDownloadSimple: this instructs PSArmoury to download a single file from an arbitrary webserver. No credentials needed.
So in the example above, the configuration instructs PSArmoury to download all files from Kevin Robertsons repostory “Invoke-TheHash” that match the inclusion filter “*.ps1”.
Once you have created your configuration, you can simply run
. .\New-PSArmoury.ps1
New-PSArmoury -Path .\MyShinyNewArmoury.ps1 -Config .\PSArmoury.json
Note that it will require you to enter credentials to use the GitHub API. You have to enter your username and a personal access token.
Here’s a screenshot using the sample config that comes with PSArmoury.
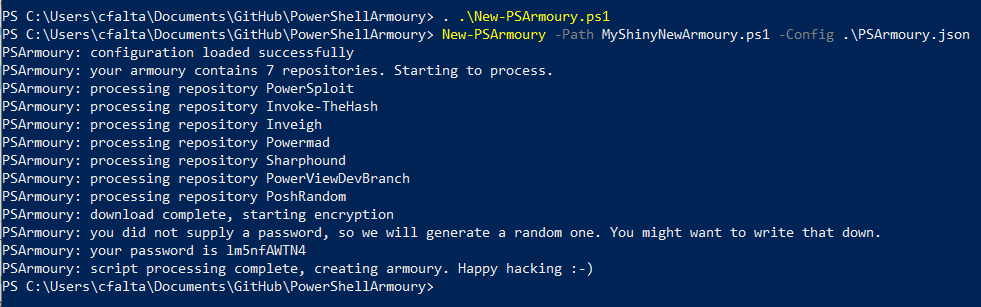
The output above mentions a password. This has been generated randomly and is included in cleartext in the resulting armoury file. This is not a problem since we use encryption only as a means of obfuscation here and not for confidentiality. Still, if you want to remove the password from your armoury you can use the -OmitPassword switch to do so. If you want to use a custom password or salt you can do this too by using the -Password and -Salt parameters.
Now, how do you use your new and shiny armoury? It’s actually very simple, just open powershell on the host of your choice and load the .ps1 file like this.
cat -raw .\MyShinyNewArmoury.ps1 | iex
And that’s it. This will disable AMSI, load all encrypted blobs into powershell and then decrypt and load them in memory. Happy Hacking :-)